Showing posts with label heating. Show all posts

Sunday, 28 September 2014

Bedroom radiator

Last weekend I did not post... I have a few pictures that I'll be posting once we finish a few more things. We mostly worked in the attic bedroom.

This weekend it was just Pim and me, and we have been working in the bathroom. One thing that got finished (installed) is the bathroom radiator:


Water pipes


Of course, solid brass screws!


Ta da!

The lightning is fluorescent (I am thinking of changing them to LED), so the pictures are not great.
After seeing the radiator all wrapped up for months on end, I can't quite believe it is up! Not running yet though, but this closes the circuit and we already have a date for a guy to come check up and start the heating and warm water up! We'll hopefully have heating in October :D

A few other random bathroom pictures:

Moldings, trims, paint got done

Soaping off the grime

Closet and a night table got a thick, sealing layer of freshly made shellac

State of the bathroom as of now

Sunday, 19 January 2014

More attic

Placing these heavy boards on
the sloped ceiling is very hard work
The insulation for the attic is all up! Boards upon boards of it. I only have started finishing with plaster, however, but since structurally it does what it's supposed to do, other priorities will come first.

I do really enjoy working with plaster, though, it is fun, although difficult to get it perfect with the little experience I have.

Plaster goo
This is a lot of fun (really)

5 radiators are up, 3 to go
The attic bedroom radiator is up and connected. We still have 3 to go: the bathroom (which will probably be delayed for a long time since the floor and the tiled wall need to be done first); the workshop, also in the attic, sometime soon; and the dining room in the back building, which is hibernating right now.

So we will probably start the heating system when the workshop radiator is installed, to heat the house up, and leave the rest for later.


Installing gas pipes, cool threading machine on the right

In order to install the kettle, the natural gas pipes had to be brought up to the workshop in the attic from the basement. For this Pim got help from a professional and they installed it in two days and then tested it for leaks.

Installing the warm water and heating system

Then he started connecting the water pipes to the kettle and the collectors. A single kettle takes care of the warm water as well as the central heating.

"Library"

I like the above image since it shows all the "layers" of the work we are doing on the walls. You see the wooden studs, the yellow glass fiber sound insulation, the polyurethane boards with plasterboard on top (and first stages of plaster finishing of the joins and covering of screws), the water and heating pipes, the electricity cables, and the gas pipe.

We caught a good deal at the DIY shop on some tiles we had been eyeing for the bathroom, so we bought them:

Bathroom tiles
They are, as it couldn't be otherwise nowadays, metro tiles ;P I could say that I truly have always loved them (several Ferrocarrils stations in Barcelona are covered in them), but who would believe me?
I was actually leaning towards flat oblongs for a plainer look, while Pim liked a bezel more. These have a very faint bezel, and everyone is happy. We bought 44 boxes with 44 tiles each.

I also finally found a suitable, cheap second hand chandelier (originally from Ikea) to use as a base for my bedroom lamp project. I have already started working on it... I'll have a dedicated post for it later!

As usual... the pictures are pretty bad. In fact, slightly more so than usual, since I have dropped my camera and the zoom lens is a bit broken, so we had to use our mobile phones to take pictures.

Tuesday, 15 October 2013

Plodding on

I haven't posted in a while… much of the work we have been doing has been repetitive: putting up more of the two kinds of insulation on different walls, mainly bedroom, knitting room and… library? there's only gonna be bookcases and cabinets in there so I guess that slightly pretentious name will have to do.

First layer of insulation

Old fashioned measuring technique

Second layer of insulation+ plasterboard, first stages of finishing

Drilling holes for pipes and cables into the basement.

Fun with power tools


Also in the basement, Pim has begun installing a water softening system (very helpful in this town with extremely hard water) and water pipe bypass.


4 radiators are up and connected: knitting room, hallway, bedroom and living. 4 more to go: bathroom, workshop, attic bedroom and dining room/kitchen. The latter is a monster of a thing and will probably get delayed indefinitely together with the refurbishing of the entire furthest building, we'll possibly move before that and improvise a temporary kitchen (we are experts at that, judging by our current "kitchen").

The last radiator installed, still wrapped up
In the places where the heating pipes aren't coming curved out of the wall, which sadly happens in a few places, we have covered it with brass (coated, sadly) tubing, which looks rather nice together with the brass valves, I think:


We've already ordered and picked up part of the electrical material, since cables, etc needs to be done at the same time than putting up insluation+plaster boards in the places where there will be outlets, switches and light points.


Definitelt the most difficult part of the renovation is figuring out what has to be done before what. Sometimes it gets paralysingly complex, when you feel you're stuck in a loop!

Contractors have started working on our back building flat roof. The thick insulation and asphalt (boo) fabric over it is placed, but the dome for the roof window is out of stock, so we are waiting for that (meanwhile the hole is covered with a board and asphalt). Then guters and finishing will also get done. And soon, hopefully, they'll also get started with the main building roof. Autumn has started and it rains every day, so a dry spell in the weather is going to get more and more challenging… hopefully it won't set us back too far. We need the roof to be placed before we install the kettle in the workshop and get the heating working, and we need to get the heating working because it is starting to get cold! So many contingencies ;)

Tuesday, 17 September 2013

Radiators

3 are up!

Living room

Entryway

Bedroom

It is a boost for our self esteem :)

Saturday, 17 August 2013

Long weekend

We were looking forward to this long weekend (Thursday to Sunday) to have more time to work on the house. Needless to say, by now (Sat) we are already broken! Today we did some shopping and left it at that, to get some rest.

Plaster, paint, a taller ladder and some other stuff
We have been placing pipes for central heating. We have changed our mind and decided to put the kettle in the attic, where the workshop will be, instead of the laundry room in the ground floor.

Removing a few more bricks from the chimney in the attic
Cold water and gas have to come up to the kettle in the attic from the basement. All the pipes with hot water will then branch down into the floors below. This way, warm water will take a longer time to arrive into the kitchen, which is next to the laundry room (we can still place a little electric heater under to sink to supplement hot water), but there will be a lot less pipe to lay, and easy access to the collectors in the workshop, where we do not have to hide them, or not much anyway.

Warm and cold water pipes going down from the attic
Originally the collectors for the central heating would have been placed in the room below the workshop, the bathroom, but this was problematic due to the large amount of pipes and bulky collectors we have to place, and having access to them was going to be challenging.

Pipes going down the chimney hole
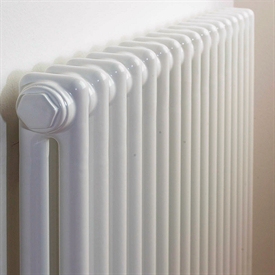
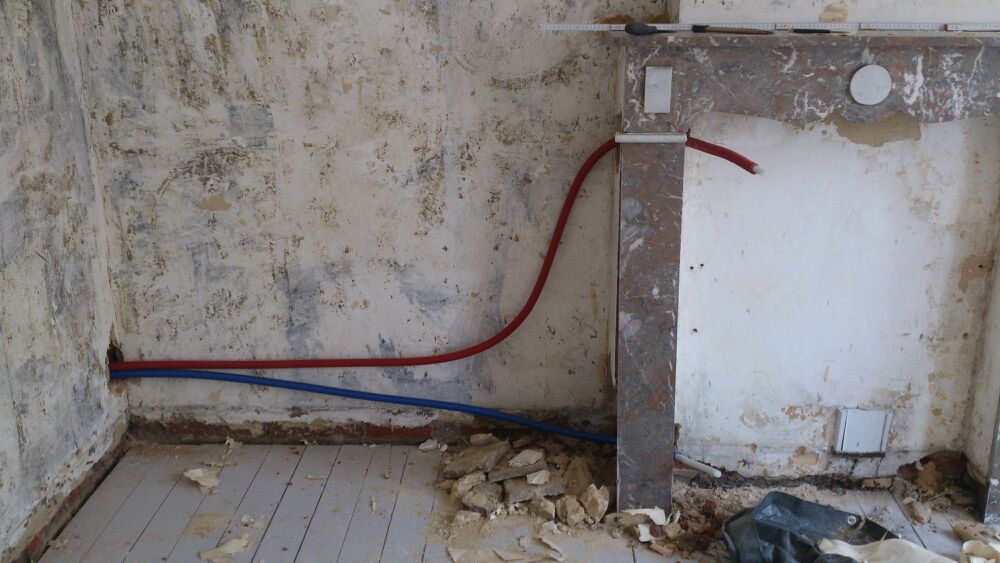
Once we have three radiators placed and connected, a guy can already come to set up the gas pipe to the kettle and start up the heating system. We will place the radiators in the bedroom, the entry hall and the living room. This means we have to already finish the walls behind them. The two pipes on the right on the picture above are for the bedroom radiator, and are already laid out. We made holes for the pipes leading to the hall radiator as well. The radiator is very tall but also very thin, since the entryway is very narrow:


The wall here is so thin that the hole for the pipes broke through to the other side on the lower bit. Oops. It turned out to be a good thing since we needed more space to have a wider curve for the warm water pipe at the bottom, which cannot be curved at a too tight a curve. Due to the thinness of the radiator, we better put the tap in a way that we won't hit our ankle with it, and so the pipe has to come from below, not at 90 degrees with the wall. I'll take a picture to illustrate this once it is installed.

The windowsill in the living room also had to be raised before the contractor comes to place the windows, as I mentioned in the previous post.


The old window and stone windowsill outside was removed, then two rows of bricks laid (recycled from the chimney), and the stone placed back:


We've also received the first delivery of insulation!


Picture on the left is insulation with drywall attached, most pipes and electricity will be hidden behind it (in a few other cases, like above, we have to cut holes in the wall to lay them). The other insulation will supplement behind the first one, that one it is better at sound isolation.

Wednesday, 7 August 2013

Wednesday, 17 July 2013

Saturday, 13 July 2013

The bedroom

  
Stripping wallpaper in the bedroom


Marble
Perhaps since it is one of the easiest rooms, we are now focusing in the bedroom. It was wallpapered, and the pine floorboards are painted light grey. We have stripped the wallpaper off, and Pim has started laying the pipes for the central heating. The single radiator will be placed inside the fireplace.


Our current bedroom is painted a deep lipstick red. I've always wanted a red bedroom, but after several years of it I am perhaps ready to move on. Our closet and night tables are lacquered white, and our bed is black lacquered steel tubing. The red does go very well with them. It would however not work all that well with our fireplace marble (left), I think.

Greys it probably is. Warm grey, since it is a North-North-West oriented room, and we like a bedroom painted in a warm colour.

I am also considering painting a landscape mural on the wall behind the bed. A couple of Pinterest inspiration images here and here.


Some paint samples

Many years ago, I studied decorative mural painting during a summer. I loved it and have only been able to use the skill once, when I painted an oil trompe l'oeil window on a wall in my parent's apartment in Barcelona.

I sure would like to use it again in my own house! I am thinking of a misty mountain landscape in the same monochrome tones of the walls, or a very limited palette.

For the floor, we will very likely sand them, then tint them a deep oak tone, and probably oil them, or perhaps varnish them (I prefer oil, and there are parket oils available). The windows will be oak toned, and we have two oak pieces of antique furniture (a vanity and a full length mirror with side tables attached) which will go in the room as well, so it seems like a good idea. For the plinths, and probably a molding where the ceiling meets wall, we think of white lacquer. I like how a white molding separates a ceiling painted a slightly lighter colour from the wall.

Oops
Some of the mantelpiece bricks fell off while making a hole for the heating pipes, but nothing that can't be easily fixed. The pipes along the wall will be hidden by the isolation panels we have to install on this and all extant walls of the house. Useful to hide pipes and cables.

Thursday, 11 July 2013

Valves

The beautiful polished brass and tinted birch thermostatic radiator valves have been delivered.


Monday, 8 July 2013

Fireplaces

The house had 4 fireplaces, two on the ground floor and two on the first floor, along two separate chimneys. The front window belongs to the first living space, which has one of these, and it opens to a smaller, second living space with the next fireplace. On the floor above, the rooms correspond identically to these, plus the entry hall (which makes the bedroom larger than the first living room below), and the fireplaces were in the same spots. And I say "had" because my partner and his dad have already removed the further set of (nearly identical) fireplaces, one directly over the other. These weren't particularly pretty, the marble was split (worse than it seemed, it had been very crappily repaired in places), and they severely interfered with furniture placement, so they went. We are planning a bathroom on the smaller room above. The hole in the picture below shows the light coming from this very sunny room once both fireplaces and chimneys were removed.


Before and after, second living room

This chimney continues its way up into the attic. The attic will also be refurbished, and this chimney completely removed, but it is too dangerous to remove the rest of it until the roof is removed as well, and remade. The fireplaces and chimneys in the front rooms will stay. They are more decorative, and we plan, at some point, to install a gas flame stove inside the fireplace in the first living room, flush with the marble. In this picture, you can see the old stove that was there before, which the previous owner took away. You can still see the slightly art deco style of the fireplace:


Inside the fireplace of the bedroom we will place a retro radiator*:

There were also a couple of chimneys in the back buildings, just a few bricks at an angle in a corner in the kitchen and the room further back (these where back to back and sharing the same chimney exit). These have also gone:


Filthy work I didn't partake in :) (I do have back problems). This my friends is a pile of broken bricks (nowhere near the whole amount).


*Radiators... we have already ordered the entire central heating system and radiators. This house has never had central heating, just coal and later gas stoves. We will place it ourselves, with help from a professional. We have ordered these radiators for the entire house (except the bathroom - we have something specialer in mind):


Zehnder Charleston

This is a classic or even retro model that we think fits perfectly with the style of the house. It is, additionally, and very importantly (especially in a house full of extremely hairy beings) very easy to clean. Everything is smooth and accessible with a brush, and the enamel is deliciously glossy so that nothing sticks to it. However... we ordered them in the deepest black available! :D a bit suicidal from the dust point of view, but one must allow for some eccentricities.