Showing posts with label kitchen. Show all posts

Wednesday, 4 January 2017

Taps

The taps have arrived one month before we expected them to!

They look fantastic. Here's a taste, some handles in the three different finishes we chose:


Brushed nickel, Tuscan brass and opaque black
We've chosen brushed nickel for the kitchen and the laundry room, opaque black for the small bathroom and Tuscan brass for the workshop. The latter is an unprotected patina, so it will change with use, same as our raw brass taps in the bathroom.

All the taps in our house are Nicolazzi.

Sunday, 10 April 2016

Dining room platform

We are still on a new window high! but new work has started in the kitchen-dining room. The dining room will be raised on a platform at the back of the room, due to the structure of the building and the incline of the terrain. It used to be a shed, divided from the rest of the structure by a wall, and higher up. All those walls are now gone but the raise remains, when everything is levelled up nicely, the difference will be 30 cm so we need two steps leading up from the kitchen.

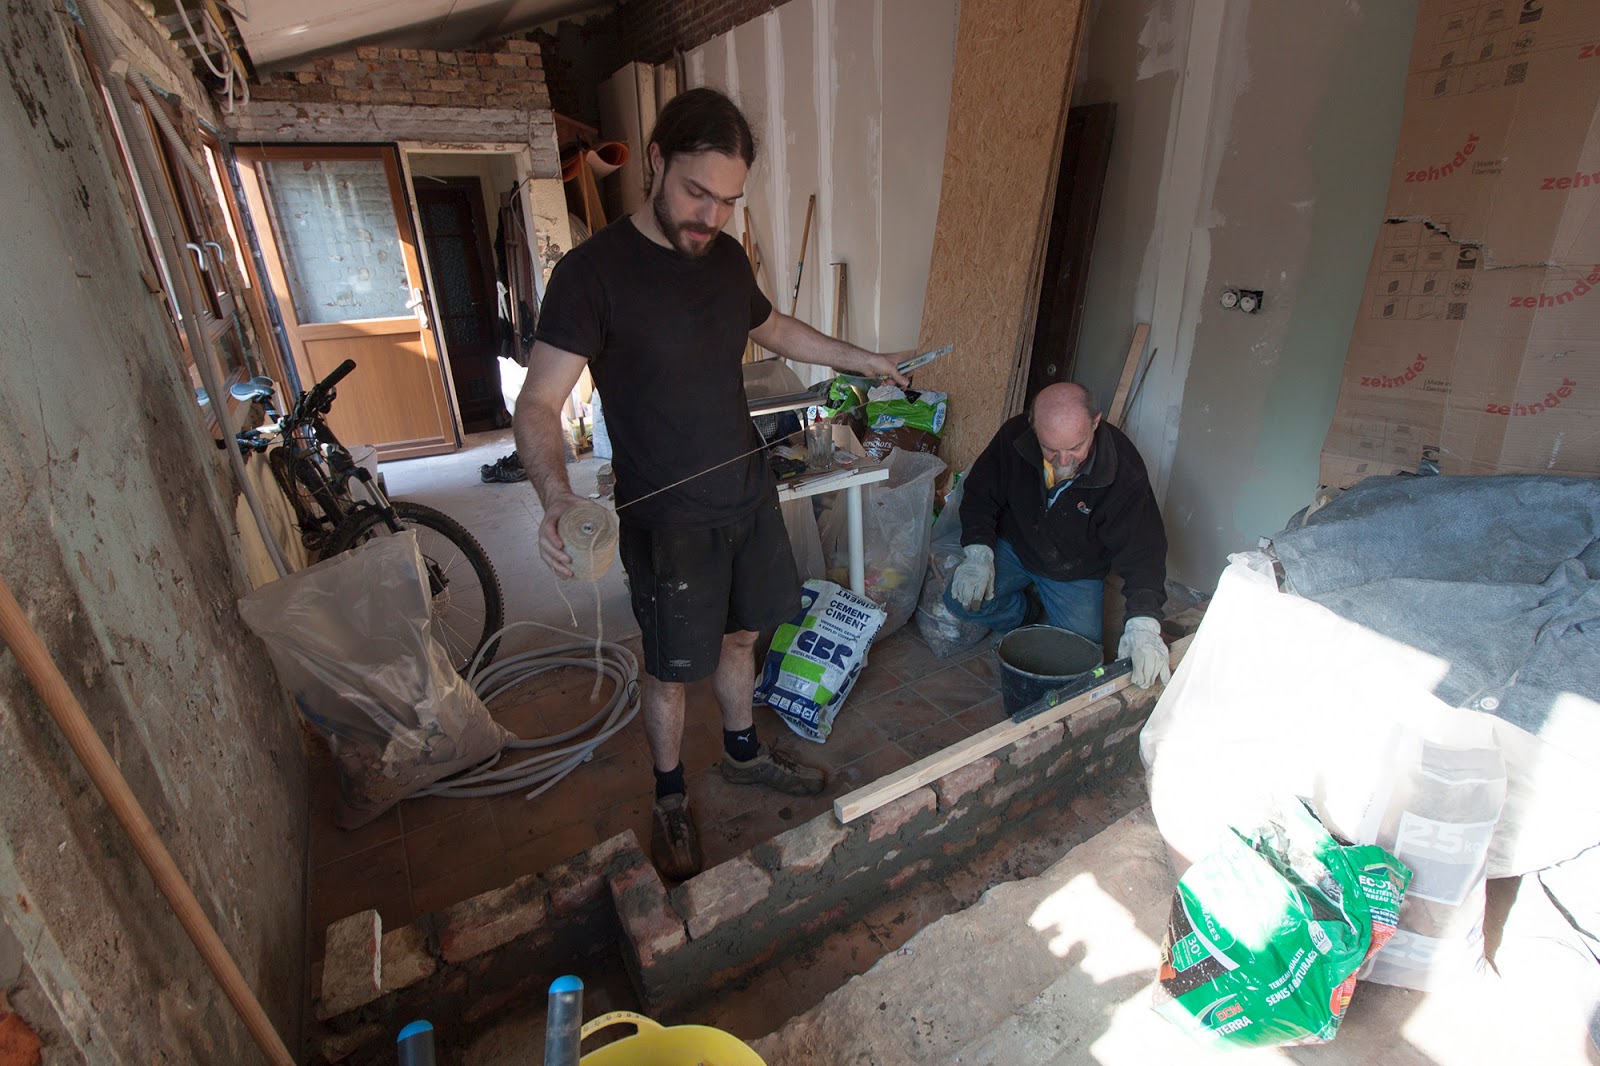
Pim's dad started building the steps with recycled bricks, I thought he went incredibly fast!


The gaps will be filled with cement and rubble (boy don't we have rubble), and then the floor evened out with a runny cement mix. Then tiles, but not before the walls and their corresponding mess are done.

Pim has still been digging the terrace outside, and I could barely move due to my sciatica flaring up, but managed to shuffle around some pots and seeds now that spring is here.

Tuesday, 5 April 2016

Kitchen window post

This post was a long way coming. Since I have a lot of images to post, I have been experimenting with some code added to the blogger template in order to have galleries to display the images. It is very clunky but it does the job. I should seriously consider importing this blog into my main website blog, but I have to think how and if I'd still like to keep it more separated.

Meanwhile, let us continue.

It has been cold, wet, and miserable. January and February are not pleasant to work around outside here. Luckily Pim and his father do not seem to mind too much, I have bad joints and I just can't work in these conditions, so besides a coat of paint in a small surface while wearing a Peruvian oversize pullover (what a wuss right?) I have done nothing of this project until the windows were in. By March however I have started gardening ;P

In the gallery below we pick up where we left in the last post:

  • Sliding door beam concrete-d, bricks removed, edges redone. First time we can really see some of the garden from the house. In this case, a big pile of bricks :D
  • Dining room window (where the shed door used to be) beam placed and concrete-d, bricks removed to widen, bricks added to make door into window, edges redone.
  • Bit of wall where the radiator goes gets painted, green of course, and the radiator put up (it was in the way, this is one very large and 100 kg heavy motherfucker).
  • Existing door widened, some bricks added between the pre-existing door and window for a stronger structure.
  • Existing window narrowed and lowered to be as low as the kitchen counter.
  • Outer windowsill stones (Belgian blue sandstone) placed. Some of these are very heavy... unlike other windowsills in the house, we had them delivered, but Pim and his dad installed them. I was able to help moving a couple ;P
  • Threshold stones placed, same as above.
  • After some delay, windows, door and sliding door/window? placed by the window guys today!
  • And now PHEW!
And now, onto other kitchen things... walls, floor, insulation...

Sunday, 31 January 2016

Next beam + bathroom closet

While Pim and his father were placing the next beam for a window in the back building, I took everything out of the bathroom closet, we took it apart, and then I cut a bit off the back legs. The floor in this room slopes towards the center and so the closet was leaning forward a lot. I guess I must have take a picture of that at some point, but I don't find it now. The top of the closet was 10 or 15 cm away from the wall when the bottom was close to the wall.

I also glued back a decorative leg piece that had fallen off, and some other parts where the hide glue had fractured a long time ago. I softened the glue with wet (warm water) kitchen paper towels, then scraped the excess off, and reglued with Titebond liquid hide glue. I think I am a convert now ;)

We put the closet back together, which is a delicate operation since the three door are caught by the top, and have to all be placed at once. It is a three man job.

This is how "level" it was

Knife wall

Chunks off

Scraping old glue off

Re-gluing

Quality control

Straight up 
Nice and close to the wall :)

On the beam front, Pim and his father encountered more difficulties than last time.


The beam that the roof guys placed over the entire length, on top of the wall, was anchored to the wall with large bolts. This made removing the old beam over the door a little difficult. This opening had to become much wider than the door so the beam had to be replaced. Pim had to drill around the bolts, concrete will later be placed around the bolts to anchor them again.

The beam was again placed over to flat and level pieces of concrete

Another recycled railway track serving as beam

Sunday, 24 January 2016

Sliding door beam


I have not been updating, we've been doing many little and finishing things, and I didn't feel like writing about those. Today however, Pim and his dad started something rather big.
We've ordered the last batch of windows for the house, for the future kitchen/dining room. These take a few months of queue and manufacture, and we've now started actually making the holes where they'll go. On the very end of our house, we're putting a large sliding door that will cover most of the wall. This was the shed, and it will be the dining room. On the picture above, you see where the hole for a beam was started. The wall of the building to the right is the neighbour's (I think it's a horse stable). This is the area where we had the hillbilly tomato roof, which we have now removed.

Pim screwed some extra pieces of wood with very large screws to hold the top portion of the wall up while making a hole and installing the beam. It was all done today as quickly as possible, and the structure held very well (the roof is mostly supported on the back and front walls anyway).

Pim's dad working on the wall. 
Above you can still see the beam that we used. They're repurposed "vintage" railroad tracks. There were several of these in the back/shed, holding up a very strong flat ceiling in concrete that we removed some time ago. The space on top of it as you can see was very small, all in all a little puzzling, it was probably the strongest ceiling of the entire house. Maybe they stored gold bars in there, haha.


The leftover beam.

Pim cut off the necessary piece of beam that we had been keeping in place, and they placed it in the hole over two flat and level blocks of concrete they had placed over the bricks.


Beam in place over the concrete blocks.


Beam in place over the concrete blocks.


More cement.


Reinforced with chicken wire.

To fill the gap over the beam again, Pim placed some recycled chicken wire we found in the garden, then concrete. So in a way it is reinforced concrete. A piece of wood and some plastic closes the gap below.


Reinforced with chicken wire.

This is not the way these things are normally done, everything would just come off and the beam placed, but we didn't want to leave this entire part of the building open to the elements in January for who knows how long... once the date to place the windows approaches, we'll remove the rest of the wall.

The same still has to be done for a couple of windows, also. We have other pieces of railroad for that.

Saturday, 14 September 2013

Ikea / Facq visit

The 31th of August we made a visit to Ikea. We are 90% decided we'll go for an Ikea kitchen, and wanted to have another look.

Vägad and Rutinerad, the microwave and oven I like, but we'll probably go
with black for appliances. These doors (STÅT) are also one of the two contenders.

Not a fan of open shelves (dirty) but I really like these

Loved this one as well, Pim is not a fan

The kitchen planner tells us not to put the ceramic sink next to
 a dishwasher (which isn't a cabinet, it is just sitting there)
 but we saw it in several places in the shop.
However, we should try to install the dishwasher higher up!

I really like cabinets built like this (to hide the kettle etc) but the total height
ends up higher than the fridge cabinets we need :( perhaps we could hack them...
These doors, Lindigö, we also like.

Still wondering if the single sink is maybe enough

We also went to Facq (bathrooms) next to Ikea. We were looking for ceramic (found none) or enamelled shower trays. We found enameled shower trays and a built in sink perhaps small enough for our antique bathroom vanity:


Upon close inspection, the vanity marble is in worse condition than I remembered.
The largest rust mark can perhaps be hidden by the sink (I want it on a side),
but there are other stains and numerous scratches.
Our marble guy said he probably can't polish this antique piece.

Sunday, 11 August 2013

Tiles

It is still gonna take a while until we can start working on the bathroom, not to mention the kitchen, which may have to wait until much after we have moved, but we are already thinking of tiles and other elements. Today I'll write about tiles ;)

We are pretty much decided on oblong (metro, subway) tiles for both rooms, but with or without bezel is still to be decided. I am leaning towards plain, and Pim towards bezel. Perhaps we can do plain in the bathroom, which will have much more tile, and with the dark grout which we'll probably use, bezel may become too busy and heavy (in combination with the wooden floors and wooden vintage furniture we'll have in the bathroom). On the other hand the kitchen will have much less tile and most likely light cabinets, so it can be more decorative.

We went looking at tiles yesterday and found some nice ones, eventually:

Altair tiles, with no bezel, 7.5x15, 10x20 and 10x30

These are available with bezel or plain, white & cream and black (and other colours which we are not interested about), the price range is similar for all the sizes. The tiles are Spanish however, and I find some hints online that these are available over there for half the price, as I suspected, so I'll have to investigate further.

We found this combination very nice:

7.5x15 ivory bezel tile next to a marble (creamy and black) trim 
And Pim really likes the idea of marble floor, and the price is not higher than that of most tiles available over here (which I find overpriced, but nonetheless). This would go very nicely with the above:

Natural stone tiles, creamy white and black marble
 I've always loved checkered floors, so I am liking this as well. Particularly at a diagonal:

This is blauwe steen, a nearly black Belgian limestone,
and a rather white (bad picture) unidentified stone.